Creating and Editing Gradients
·1 min read
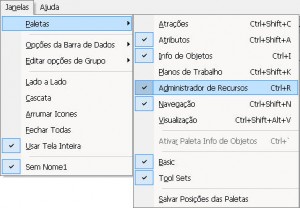
Go to the menu Window/Palettes/Resource Browser (Window/Palettes/Resource Browser) Ctrl+R (figure 1).
figure 1 - Window/Palettes/Resource Browser menu.
Click the arrow-shaped button next to the Resources (Resources) title; hover over the New Resource in... (New Resource in...) option and then choose Gradient... (Gradient...) (figure 2).
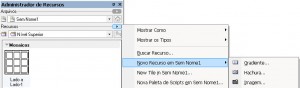 figure 2 - Adding a new resource.
In the window that opens, choose (figure 3):
figure 2 - Adding a new resource.
In the window that opens, choose (figure 3):
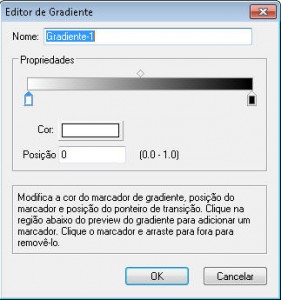 figure 3 - Gradient Editor.
Name (Name): Give the new gradient a name;
Double-click any of the control points to change its color;
Slide the control points to change the gradient's appearance;
Click the indicated area to insert a new color control point. To remove a control point, just click it and drag it away from the color bar;
The Color (Color) and Position (Position) controls can also be used to adjust the control points that define the gradient.
Click OK to confirm the creation of the gradient.
See in the Resource Browser (Resource Browser) palette that the gradient is now saved in your file's resources area (figure 4).
figure 3 - Gradient Editor.
Name (Name): Give the new gradient a name;
Double-click any of the control points to change its color;
Slide the control points to change the gradient's appearance;
Click the indicated area to insert a new color control point. To remove a control point, just click it and drag it away from the color bar;
The Color (Color) and Position (Position) controls can also be used to adjust the control points that define the gradient.
Click OK to confirm the creation of the gradient.
See in the Resource Browser (Resource Browser) palette that the gradient is now saved in your file's resources area (figure 4).
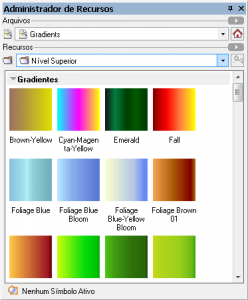 figure 4 - Resource Browser.
To apply the gradient to an object, select it and then double-click the gradient thumbnail in the Resource Browser (Resource Browser) palette. You can also click the gradient thumbnail and drag it onto the object to apply it (figure 5).
figure 4 - Resource Browser.
To apply the gradient to an object, select it and then double-click the gradient thumbnail in the Resource Browser (Resource Browser) palette. You can also click the gradient thumbnail and drag it onto the object to apply it (figure 5).
 figure 5 - Applying the Gradient.
Did you like this post?
It was based on the topic Resources to increase productivity, Creating and editing gradients,
which is part of the book Vectorworks passo a passo,
available in print or e-book.
For more information or to purchase the book,
visit the site www.livrovectorworks.com.br
figure 5 - Applying the Gradient.
Did you like this post?
It was based on the topic Resources to increase productivity, Creating and editing gradients,
which is part of the book Vectorworks passo a passo,
available in print or e-book.
For more information or to purchase the book,
visit the site www.livrovectorworks.com.br
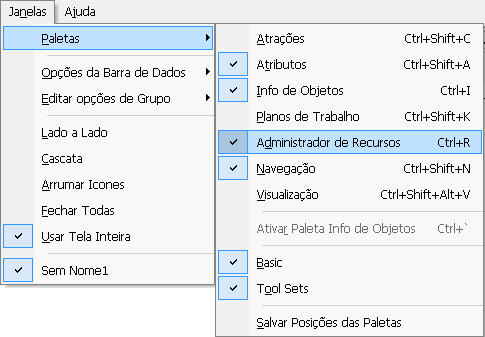 figure 1 - Window/Palettes/Resource Browser menu.
Click the arrow-shaped button next to the Resources (Resources) title; hover over the New Resource in... (New Resource in...) option and then choose Gradient... (Gradient...) (figure 2).
figure 1 - Window/Palettes/Resource Browser menu.
Click the arrow-shaped button next to the Resources (Resources) title; hover over the New Resource in... (New Resource in...) option and then choose Gradient... (Gradient...) (figure 2).
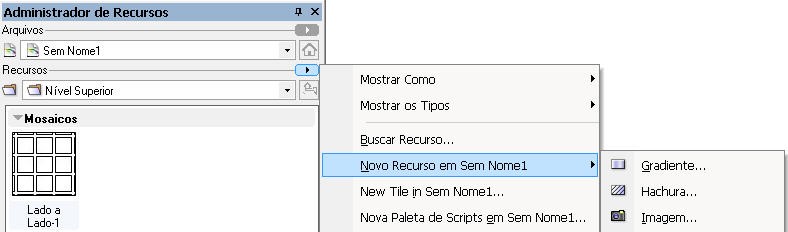 figure 2 - Adding a new resource.
In the window that opens, choose (figure 3):
figure 2 - Adding a new resource.
In the window that opens, choose (figure 3):
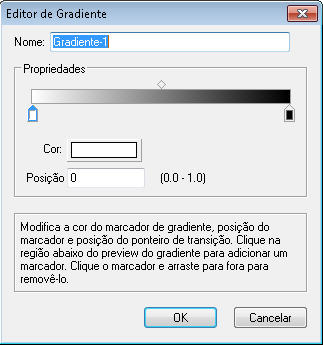 figure 3 - Gradient Editor.
Name (Name): Give the new gradient a name;
Double-click any of the control points to change its color;
Slide the control points to change the gradient's appearance;
Click the indicated area to insert a new color control point. To remove a control point, just click it and drag it away from the color bar;
The Color (Color) and Position (Position) controls can also be used to adjust the control points that define the gradient.
Click OK to confirm the creation of the gradient.
See in the Resource Browser (Resource Browser) palette that the gradient is now saved in your file's resources area (figure 4).
figure 3 - Gradient Editor.
Name (Name): Give the new gradient a name;
Double-click any of the control points to change its color;
Slide the control points to change the gradient's appearance;
Click the indicated area to insert a new color control point. To remove a control point, just click it and drag it away from the color bar;
The Color (Color) and Position (Position) controls can also be used to adjust the control points that define the gradient.
Click OK to confirm the creation of the gradient.
See in the Resource Browser (Resource Browser) palette that the gradient is now saved in your file's resources area (figure 4).
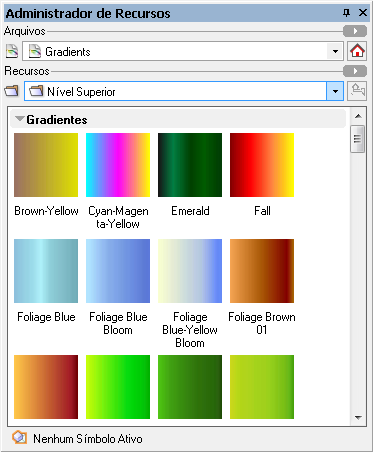 figure 4 - Resource Browser.
To apply the gradient to an object, select it and then double-click the gradient thumbnail in the Resource Browser (Resource Browser) palette. You can also click the gradient thumbnail and drag it onto the object to apply it (figure 5).
figure 4 - Resource Browser.
To apply the gradient to an object, select it and then double-click the gradient thumbnail in the Resource Browser (Resource Browser) palette. You can also click the gradient thumbnail and drag it onto the object to apply it (figure 5).
 figure 5 - Applying the Gradient.
Did you like this post?
It was based on the topic Resources to increase productivity, Creating and editing gradients,
which is part of the book Vectorworks passo a passo,
available in print or e-book.
For more information or to purchase the book,
visit the site www.livrovectorworks.com.br
figure 5 - Applying the Gradient.
Did you like this post?
It was based on the topic Resources to increase productivity, Creating and editing gradients,
which is part of the book Vectorworks passo a passo,
available in print or e-book.
For more information or to purchase the book,
visit the site www.livrovectorworks.com.br


