How and Why to Use Hotlinked Modules
·4 min read
what modules are
Modules are useful whenever you need to use repetitive or standardized structures in one or more projects. You create a module by drawing it normally just once, and you can use it as many times as you want in any project. The advantage is that, if a change needs to be made to the module, that change can be updated across all the files containing copies of it. There are two ways to create a module: save a project as a module, or save selected elements of a project as a module. ArchiCAD saves a module with the .mod extension.
how to save a project as a module
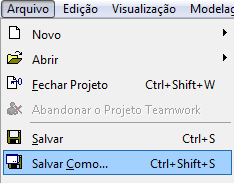
After building the model that will be turned into a module, in the floor plan, go to the menu File/Save As... (File/Save As...) Ctrl+Shift+S.
figure 1 - File/Save As... menu In the Save Plan (Save Plan) menu, give your file a name and choose the Module File (Module File) format (*.mod). Click the Options... (Options) button and, in the window that opens, select:
all Stories (all Stories): Saves the elements from all stories of the project;
the Current Story (the Current Story): Saves the elements of the active story;
the Range (the Range): Allows you to choose a specific range of stories;
Add displayed Elements of other Stories (Add displayed Elements of
other Stories): In addition to the elements belonging to the
selected story, adds to the saved file the elements from other stories that are being displayed on it;
Break nested Hotlinks (Break nested Hotlinks): If the view already contains a
module, saving will undo that link;
Compress file (Compress file): This option comes selected by default in
ArchiCAD and reduces file size by up to 7%. It should only be disabled if the file saving time becomes too long.
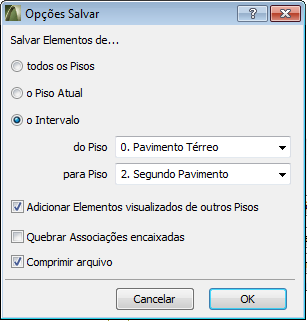 figure 2 - Save Options window After setting these, click OK and then Save (Save).
how to save selected elements as a module
In the floor plan, select the elements you want to save as a module. For a selection that spans multiple stories, use the Marquee Tool (Marquee Tool) in all Stories (all Stories) mode. Go to the menu File/External Content/Save Selection as Module... (File/External Content/Save Selection as Module...).
figure 2 - Save Options window After setting these, click OK and then Save (Save).
how to save selected elements as a module
In the floor plan, select the elements you want to save as a module. For a selection that spans multiple stories, use the Marquee Tool (Marquee Tool) in all Stories (all Stories) mode. Go to the menu File/External Content/Save Selection as Module... (File/External Content/Save Selection as Module...).
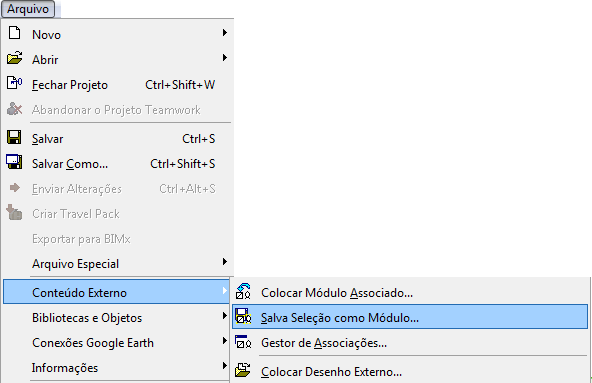 figure 3 - Save Selection as Module... command
In the Save Hotlinked Module (Save Hotlinked Module) menu, give the file a name. The Replace Selection with this hotlinked module file (Replace Selection with this hotlinked module file) option makes the selected elements, once saved as a module, merge into a single one. Click Save (Save).
how to place a module
In the file where you want to insert the module, go to the menu File/External Content/Place Hotlinked Module... (Place Hotlinked module...).
figure 3 - Save Selection as Module... command
In the Save Hotlinked Module (Save Hotlinked Module) menu, give the file a name. The Replace Selection with this hotlinked module file (Replace Selection with this hotlinked module file) option makes the selected elements, once saved as a module, merge into a single one. Click Save (Save).
how to place a module
In the file where you want to insert the module, go to the menu File/External Content/Place Hotlinked Module... (Place Hotlinked module...).
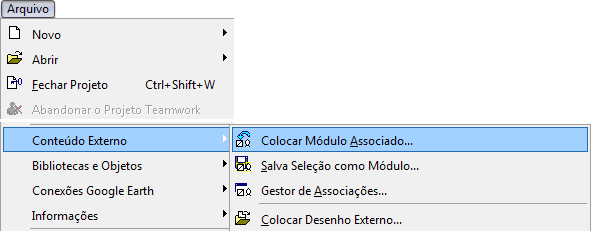 figure 4 - Place Hotlinked Module... command
In the Place Module (Place Module) menu, click the Choose Hotlink... (Choose Hotlink...) button.
figure 4 - Place Hotlinked Module... command
In the Place Module (Place Module) menu, click the Choose Hotlink... (Choose Hotlink...) button.
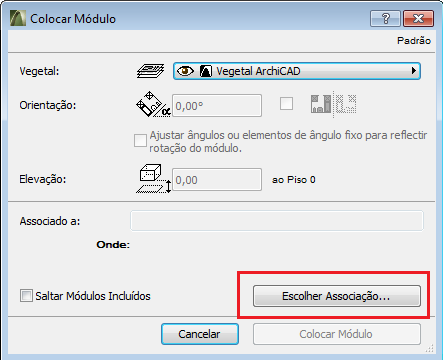 figure 5 - Place Module menu
In the next menu, click New Hotlink... (New Hotlink...) and then choose the from File (from File) option to look for files on your computer, or, if you are working with a module that is part of a Teamwork project, choose from Teamwork Project (from Teamwork Project).
figure 5 - Place Module menu
In the next menu, click New Hotlink... (New Hotlink...) and then choose the from File (from File) option to look for files on your computer, or, if you are working with a module that is part of a Teamwork project, choose from Teamwork Project (from Teamwork Project).
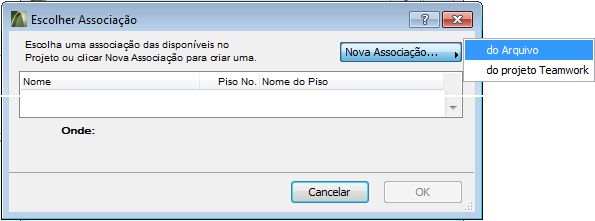 figure 6 - Choose Hotlink menu
In the New Hotlink (New Hotlink) menu, locate and select the desired file and click Select (Select). Back in the Choose Hotlink (Choose Hotlink) menu, select the module and click OK.
figure 6 - Choose Hotlink menu
In the New Hotlink (New Hotlink) menu, locate and select the desired file and click Select (Select). Back in the Choose Hotlink (Choose Hotlink) menu, select the module and click OK.
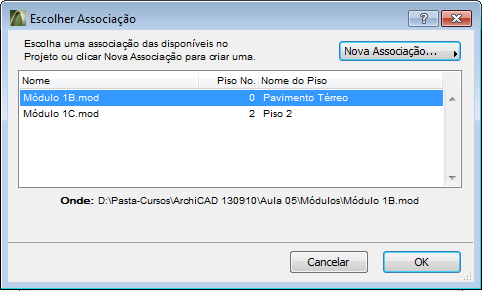 figure 7 - Choose Hotlink menu
In the Place Module (Place Module) menu you can set:
Layer (Master Layer): Choose the layer the module will be linked to;
Orientation (Orientation): If needed, set a different angle for the module than the one defined in the original file. Elements that by default have fixed angles (such as labels or Zone stamps set to Fixed Angle) will not be affected by the specified angle unless the option to adjust the angle of fixed-angle elements to reflect the module's rotation is turned on. To mirror the module, using the original file's position as a reference, enable the Orientation option to place a Mirrored Module;
Elevation (Elevation): If needed, add an elevation, relative to level zero, that will be added to the value set in the original file;
Skip Nested Modules (Skip Nested Modules): Enable this option if you want the modules linked to the module being inserted, if any, not to be included.
To finish, click Place Module (Place Module).
figure 7 - Choose Hotlink menu
In the Place Module (Place Module) menu you can set:
Layer (Master Layer): Choose the layer the module will be linked to;
Orientation (Orientation): If needed, set a different angle for the module than the one defined in the original file. Elements that by default have fixed angles (such as labels or Zone stamps set to Fixed Angle) will not be affected by the specified angle unless the option to adjust the angle of fixed-angle elements to reflect the module's rotation is turned on. To mirror the module, using the original file's position as a reference, enable the Orientation option to place a Mirrored Module;
Elevation (Elevation): If needed, add an elevation, relative to level zero, that will be added to the value set in the original file;
Skip Nested Modules (Skip Nested Modules): Enable this option if you want the modules linked to the module being inserted, if any, not to be included.
To finish, click Place Module (Place Module).
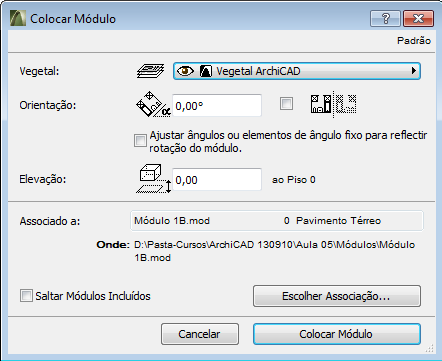 figure 8 - Place Module menu
Now all you need to do is click to position the module in the floor plan.
figure 8 - Place Module menu
Now all you need to do is click to position the module in the floor plan.
figure 1 - File/Save As... menu In the Save Plan (Save Plan) menu, give your file a name and choose the Module File (Module File) format (*.mod). Click the Options... (Options) button and, in the window that opens, select:
all Stories (all Stories): Saves the elements from all stories of the project;
the Current Story (the Current Story): Saves the elements of the active story;
the Range (the Range): Allows you to choose a specific range of stories;
Add displayed Elements of other Stories (Add displayed Elements of
other Stories): In addition to the elements belonging to the
selected story, adds to the saved file the elements from other stories that are being displayed on it;
Break nested Hotlinks (Break nested Hotlinks): If the view already contains a
module, saving will undo that link;
Compress file (Compress file): This option comes selected by default in
ArchiCAD and reduces file size by up to 7%. It should only be disabled if the file saving time becomes too long.
figure 2 - Save Options window After setting these, click OK and then Save (Save).
how to save selected elements as a module
In the floor plan, select the elements you want to save as a module. For a selection that spans multiple stories, use the Marquee Tool (Marquee Tool) in all Stories (all Stories) mode. Go to the menu File/External Content/Save Selection as Module... (File/External Content/Save Selection as Module...).
figure 3 - Save Selection as Module... command
In the Save Hotlinked Module (Save Hotlinked Module) menu, give the file a name. The Replace Selection with this hotlinked module file (Replace Selection with this hotlinked module file) option makes the selected elements, once saved as a module, merge into a single one. Click Save (Save).
how to place a module
In the file where you want to insert the module, go to the menu File/External Content/Place Hotlinked Module... (Place Hotlinked module...).
figure 4 - Place Hotlinked Module... command
In the Place Module (Place Module) menu, click the Choose Hotlink... (Choose Hotlink...) button.
figure 5 - Place Module menu
In the next menu, click New Hotlink... (New Hotlink...) and then choose the from File (from File) option to look for files on your computer, or, if you are working with a module that is part of a Teamwork project, choose from Teamwork Project (from Teamwork Project).
figure 6 - Choose Hotlink menu
In the New Hotlink (New Hotlink) menu, locate and select the desired file and click Select (Select). Back in the Choose Hotlink (Choose Hotlink) menu, select the module and click OK.
figure 7 - Choose Hotlink menu
In the Place Module (Place Module) menu you can set:
Layer (Master Layer): Choose the layer the module will be linked to;
Orientation (Orientation): If needed, set a different angle for the module than the one defined in the original file. Elements that by default have fixed angles (such as labels or Zone stamps set to Fixed Angle) will not be affected by the specified angle unless the option to adjust the angle of fixed-angle elements to reflect the module's rotation is turned on. To mirror the module, using the original file's position as a reference, enable the Orientation option to place a Mirrored Module;
Elevation (Elevation): If needed, add an elevation, relative to level zero, that will be added to the value set in the original file;
Skip Nested Modules (Skip Nested Modules): Enable this option if you want the modules linked to the module being inserted, if any, not to be included.
To finish, click Place Module (Place Module).
figure 8 - Place Module menu
Now all you need to do is click to position the module in the floor plan.


