How and why to create worksheets
·2 min read
The Worksheet (Worksheet) is a drawing space in ArchiCAD where you can draw exclusively in 2D. This 2D drawing can be created from any view of your model (plans, sections, elevations, etc.). You can also import a .dwg drawing, or an image, into a worksheet (called an independent worksheet), and use it as a reference to develop your project, since worksheets can be used as "tracing paper" on any floor of your model. You can also use a worksheet to store 2D detail drawings, which can later be placed on a layout sheet for documentation. It's important to remember that drawings placed on a worksheet have no link to, or influence of any kind on, the creation of the virtual building.
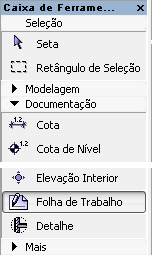
To create a worksheet from a view of your model, click the Worksheet (Worksheet) tool in the Toolbox (Toolbox).
figure 1 - Worksheet tool in the Toolbox
 figure 2 - Geometry Method options in the Info Box Contents
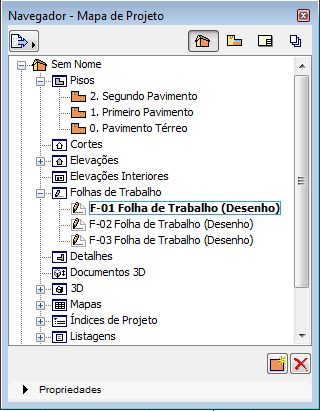 figure 4 - arrangement of worksheets in the Navigator palette Independent Worksheet
An independent worksheet is an empty 2D drawing environment. In it, you can start drawing from scratch, copy and paste a selected region from a model view, or even import .DWG drawings, PDF files, and images, and then make whatever changes you want. It can be used to store a .DWG file to be used as a Reference Trace for modeling. To create an independent worksheet, go to the menu Document/Documenting Tools/Create Independent Worksheet (Document/Documenting Tools/Create Independent Worksheet) or go to Navigator/Project Map (Navigator/Project Map), right-click on Worksheets (Worksheets) and choose New Independent Worksheet... (New Independent Worksheet) as shown in figure 5.
figure 4 - arrangement of worksheets in the Navigator palette Independent Worksheet
An independent worksheet is an empty 2D drawing environment. In it, you can start drawing from scratch, copy and paste a selected region from a model view, or even import .DWG drawings, PDF files, and images, and then make whatever changes you want. It can be used to store a .DWG file to be used as a Reference Trace for modeling. To create an independent worksheet, go to the menu Document/Documenting Tools/Create Independent Worksheet (Document/Documenting Tools/Create Independent Worksheet) or go to Navigator/Project Map (Navigator/Project Map), right-click on Worksheets (Worksheets) and choose New Independent Worksheet... (New Independent Worksheet) as shown in figure 5.
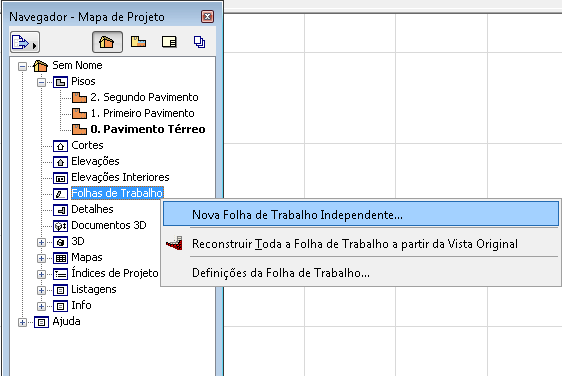 figure 5 - how to create an independent worksheet from the Navigator palette Give the new sheet a name and click Create (Create).
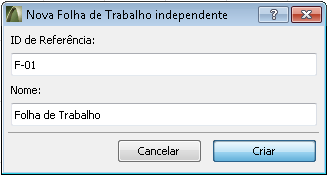 figure 6 - naming and creating a worksheet The newly created worksheet will be activated, making all the 2D tools available for you to use as needed.
figure 1 - Worksheet tool in the Toolbox
Next, in the Info Box Contents (Info Box Contents), choose one of the four Geometry Method (Geometry Method) options highlighted in figure 2.
figure 2 - Geometry Method options in the Info Box Contents
Based on the geometry method chosen, select the desired area from any view of your model, shown in figure 3 as the light blue rectangle, and click to set the location of the marker indicating the presence of a worksheet.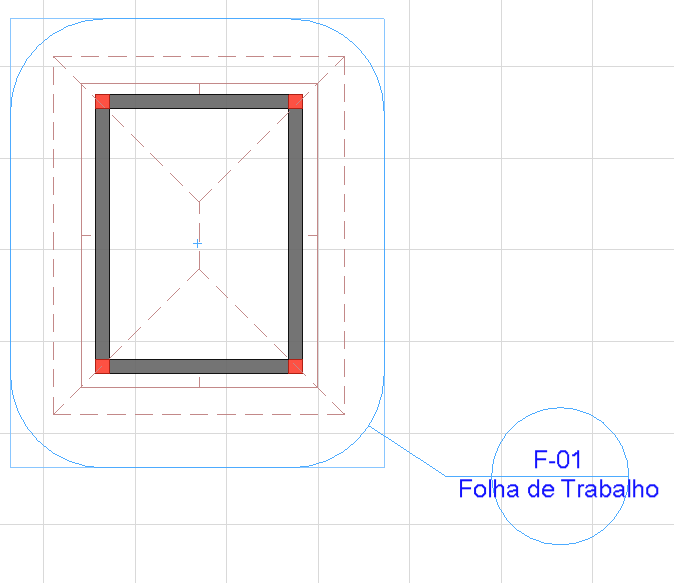
You can access and edit the contents of the worksheet by double-clicking the sheet's name in the Navigator/Project Map/Worksheets (Navigator/Project Map/Worksheets). From there you can only draw in 2D. Keep in mind that changes made on this worksheet are not linked to the original model.
figure 4 - arrangement of worksheets in the Navigator palette Independent Worksheet
An independent worksheet is an empty 2D drawing environment. In it, you can start drawing from scratch, copy and paste a selected region from a model view, or even import .DWG drawings, PDF files, and images, and then make whatever changes you want. It can be used to store a .DWG file to be used as a Reference Trace for modeling. To create an independent worksheet, go to the menu Document/Documenting Tools/Create Independent Worksheet (Document/Documenting Tools/Create Independent Worksheet) or go to Navigator/Project Map (Navigator/Project Map), right-click on Worksheets (Worksheets) and choose New Independent Worksheet... (New Independent Worksheet) as shown in figure 5.
figure 5 - how to create an independent worksheet from the Navigator palette Give the new sheet a name and click Create (Create).
figure 6 - naming and creating a worksheet The newly created worksheet will be activated, making all the 2D tools available for you to use as needed.



