How to Create a Texture from an Image
·2 min read
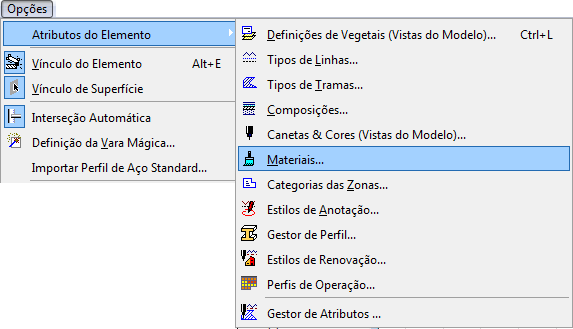
To create a new texture, go to the menu Options/Element Attributes/Materials... (Options/Element Attributes/Materials...).
figure 1 - location of the Materials... menu
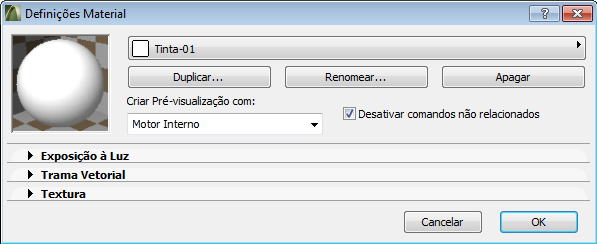 figure 2 - Material Settings menu
Enter a name and click OK.
figure 2 - Material Settings menu
Enter a name and click OK.
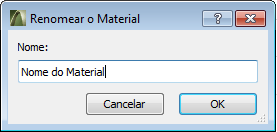 figure 3 - Rename Material menu
Before making the settings, note that you can choose which rendering engine will be used to create the preview shown while you adjust the setting values.
figure 3 - Rename Material menu
Before making the settings, note that you can choose which rendering engine will be used to create the preview shown while you adjust the setting values.
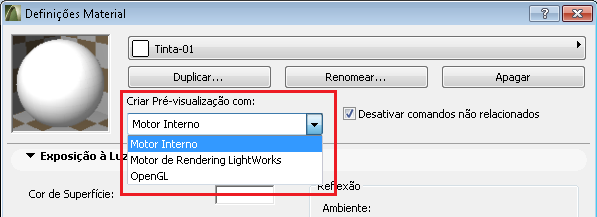 figure 4 - how to choose the rendering engine for the preview On the Exposure to Light (Exposure to Light) tab, the edited parameters are only taken into account when the Internal Rendering Engine or the OpenGl Engine are used for rendering. Set the parameters of the material you created keeping in mind that:
Surface Color: choose the material's color using the Edit Color palette. The choice can be made graphically or numerically.
Transparency: configure how light passes through the material. The higher the Transmittance, the more light is transmitted through the material. Attenuation deals with how Transmittance behaves as the line of sight moves further away.
Emission: determine how much light this material emits. Attenuation corresponds to the intensity of the light emission; if it decreases, the material's emission decreases as well.
Reflection: there are three controls available for configuration. The Ambient control lets you define how much of the ambient light this material can reflect, which allows for shine effects on the material. The Diffuse control refers to the material's color; the rougher the material, the more diffuse its reflection. Shine represents the material surface's ability to reflect directional light from a light source in a reasonably focused way. The more focused it is, the shinier the surface.
Shine: you control the material's shine through its Specular setting, which is the opposite of Diffuse. The harder and smoother the surface, the stronger its specular reflections. As for the Specular Color, it generally matches the color of the directional light, but it can be changed if needed. The combination of the specular, material, and light colors determines the color of the surface that reflects the directional light.
figure 4 - how to choose the rendering engine for the preview On the Exposure to Light (Exposure to Light) tab, the edited parameters are only taken into account when the Internal Rendering Engine or the OpenGl Engine are used for rendering. Set the parameters of the material you created keeping in mind that:
Surface Color: choose the material's color using the Edit Color palette. The choice can be made graphically or numerically.
Transparency: configure how light passes through the material. The higher the Transmittance, the more light is transmitted through the material. Attenuation deals with how Transmittance behaves as the line of sight moves further away.
Emission: determine how much light this material emits. Attenuation corresponds to the intensity of the light emission; if it decreases, the material's emission decreases as well.
Reflection: there are three controls available for configuration. The Ambient control lets you define how much of the ambient light this material can reflect, which allows for shine effects on the material. The Diffuse control refers to the material's color; the rougher the material, the more diffuse its reflection. Shine represents the material surface's ability to reflect directional light from a light source in a reasonably focused way. The more focused it is, the shinier the surface.
Shine: you control the material's shine through its Specular setting, which is the opposite of Diffuse. The harder and smoother the surface, the stronger its specular reflections. As for the Specular Color, it generally matches the color of the directional light, but it can be changed if needed. The combination of the specular, material, and light colors determines the color of the surface that reflects the directional light.
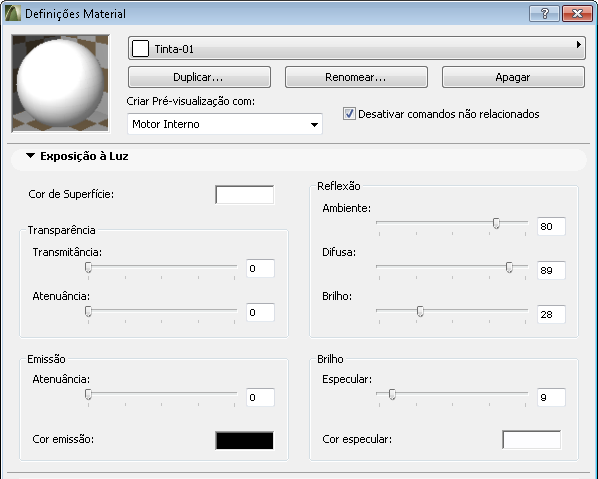 figure 5 - highlight of the Exposure to Light tab The Vectorial Hatching (Vectorial Hatching) tab is used to associate a hatch pattern with the material (the fill used to represent the texture in views that are not rendered). You can only choose among the hatches defined as Surface Hatches.
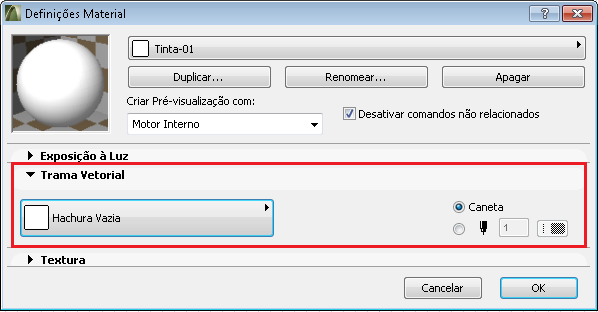 figure 6 - highlight of the Vectorial Hatching tab
figure 1 - location of the Materials... menu
Click on a texture, click Duplicate... (Duplicate...), then the Rename... (Rename...) button.
figure 2 - Material Settings menu
Enter a name and click OK.
figure 3 - Rename Material menu
Before making the settings, note that you can choose which rendering engine will be used to create the preview shown while you adjust the setting values.
figure 4 - how to choose the rendering engine for the preview On the Exposure to Light (Exposure to Light) tab, the edited parameters are only taken into account when the Internal Rendering Engine or the OpenGl Engine are used for rendering. Set the parameters of the material you created keeping in mind that:
Surface Color: choose the material's color using the Edit Color palette. The choice can be made graphically or numerically.
Transparency: configure how light passes through the material. The higher the Transmittance, the more light is transmitted through the material. Attenuation deals with how Transmittance behaves as the line of sight moves further away.
Emission: determine how much light this material emits. Attenuation corresponds to the intensity of the light emission; if it decreases, the material's emission decreases as well.
Reflection: there are three controls available for configuration. The Ambient control lets you define how much of the ambient light this material can reflect, which allows for shine effects on the material. The Diffuse control refers to the material's color; the rougher the material, the more diffuse its reflection. Shine represents the material surface's ability to reflect directional light from a light source in a reasonably focused way. The more focused it is, the shinier the surface.
Shine: you control the material's shine through its Specular setting, which is the opposite of Diffuse. The harder and smoother the surface, the stronger its specular reflections. As for the Specular Color, it generally matches the color of the directional light, but it can be changed if needed. The combination of the specular, material, and light colors determines the color of the surface that reflects the directional light.
figure 5 - highlight of the Exposure to Light tab The Vectorial Hatching (Vectorial Hatching) tab is used to associate a hatch pattern with the material (the fill used to represent the texture in views that are not rendered). You can only choose among the hatches defined as Surface Hatches.
figure 6 - highlight of the Vectorial Hatching tab



